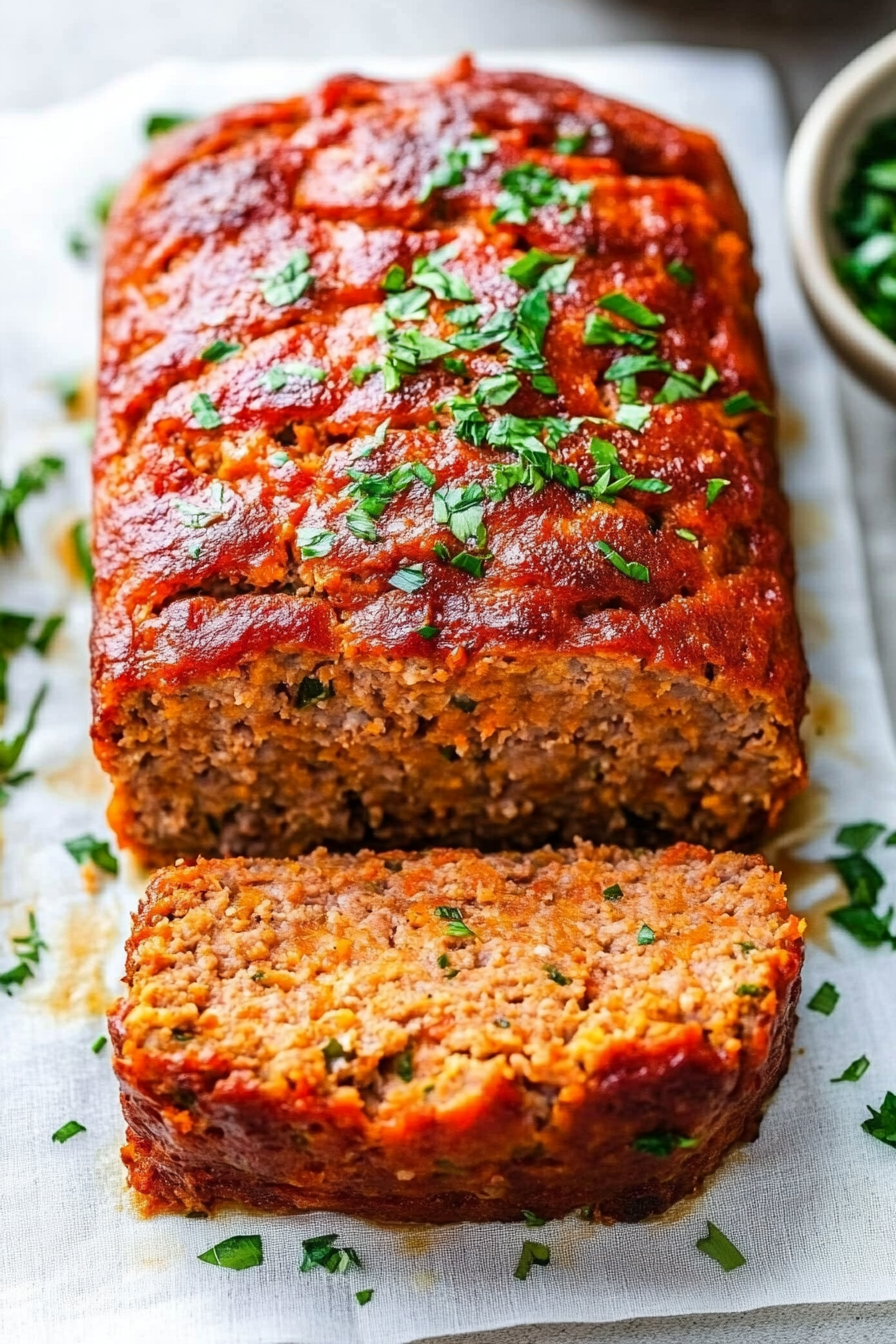
Delicious Turkey Sweet Potato Meatloaf Recipe
There’s something special about baking that brings people together, don’t you think? I mean, think of all the memories we’ve made around the oven, the laughter, the tears, the late-night snacks – it’s all so quintessentially human. For me, baking is more than just following a recipe; it’s about making a connection with the people I love, with the food I create, and with the joy that comes from sharing it with others. That’s why I’m so excited to share this recipe with you today – it’s a true labor of love that’s been perfected over years of trial and error, and it’s a testament to the power of food to bring us together.
What is this recipe?
At its core, this recipe is all about embracing the simplicity and elegance of a classic dessert. It’s essentially a cross between a cake and a crumble, with a moist, fluffy interior and a crunchy, buttery topping. But don’t let its humble origins fool you – this is a showstopper that’s sure to impress even the most discerning palates. And the best part? It’s incredibly easy to make, even for those who are new to baking.
Why you’ll love this recipe?
So, what makes this recipe so special? For starters, the flavor is incredible – it’s like a symphony of sweet and tangy notes that will leave you wanting more. And the texture? Absolutely divine. But what really sets this recipe apart is its sheer versatility. Whether you’re serving it as a dessert, a snack, or even a breakfast treat, this cake is sure to please. Plus, it’s incredibly budget-friendly, making it the perfect option for anyone looking to stretch their culinary dollars.
How do I make this recipe?
Quick Overview
Before we dive into the nitty-gritty of this recipe, let me give you a quick rundown of what you can expect. This cake is incredibly easy to make, and the entire process should take no more than 30-40 minutes. Simply preheat your oven to 350°F (180°C), mix together the dry ingredients, add in the wet ingredients, and voila! You’ll have a perfectly baked cake that’s sure to impress.
Ingredients
For the Main Batter:
* 2 1/4 cups (285g) all-purpose flour
* 1 1/2 cups (180g) granulated sugar
* 2 teaspoons baking powder
* 1 teaspoon salt
* 1/2 cup (115g) unsalted butter, softened
* 2 large eggs
* 2 teaspoons vanilla extract
* 1 cup (235ml) whole milk
For the Filling:
* 1 cup (200g) confectioners’ sugar
* 2 tablespoons unsalted butter, softened
* 1 teaspoon vanilla extract
* 1/4 cup (60g) chopped fresh fruit (such as strawberries or blueberries)
For the Glaze:
* 1 cup (200g) confectioners’ sugar
* 2 tablespoons unsalted butter, softened
* 1 teaspoon vanilla extract
* 2 tablespoons milk
Step-by-Step Instructions
Step 1: Preheat & Prep Pan
Preheat your oven to 350°F (180°C) and grease a 9×9-inch (23x23cm) baking dish. I like to use a non-stick pan for this recipe, as it makes release a breeze. If you don’t have a non-stick pan, don’t worry – a regular pan will work just fine.
Step 2: Mix Dry Ingredients
In a medium bowl, whisk together the flour, sugar, baking powder, and salt. I like to use a stand mixer for this step, as it ensures everything gets mixed evenly. If you’re using a hand mixer, just be sure to stop and scrape down the sides of the bowl a few times to ensure everything gets incorporated.
Step 3: Mix Wet Ingredients
In a separate bowl, whisk together the butter, eggs, vanilla extract, and milk. Again, I like to use a stand mixer for this step, but a hand mixer will work just fine. Just be sure to stop and scrape down the sides of the bowl a few times to ensure everything gets incorporated.
Step 4: Combine
Add the wet ingredients to the dry ingredients and mix until just combined. Don’t overmix – you want the batter to be smooth, but still retain a bit of texture.
Step 5: Prepare Filling
In a small bowl, mix together the confectioners’ sugar, butter, vanilla extract, and chopped fruit. I like to use a fork for this step, as it ensures everything gets mixed evenly.
Step 6: Layer & Swirl
Pour half the batter into the prepared pan and smooth out the top. Add the filling mixture on top of the batter, then pour the remaining batter over the filling. Use a spatula to create a swirly design on top of the cake – it’s the perfect touch of elegance.
Step 7: Bake
Bake the cake for 25-30 minutes, or until a toothpick inserted into the center comes out clean. I like to check the cake at the 20-minute mark, just to make sure it’s not overcooking.
Step 8: Cool & Glaze
Let the cake cool in the pan for 5-10 minutes, then transfer it to a wire rack to cool completely. Once the cake is cool, drizzle the glaze over the top and serve.
Step 9: Slice & Serve
Slice the cake into squares or rectangles, depending on your preference. I like to serve this cake with a dollop of whipped cream or a sprinkle of powdered sugar – it adds just the right touch of sweetness.
What to Serve It With
This cake is incredibly versatile, so feel free to serve it with whatever you like. Some of my favorite pairing options include:
For Breakfast: Serve with a cup of coffee or tea, or as a topping for yogurt or oatmeal.
For Brunch: Pair with a glass of juice or a mimosa for a decadent treat.
As Dessert: Serve with a scoop of ice cream or a dollop of whipped cream for the ultimate indulgence.
For Cozy Snacks: Enjoy with a cup of hot cocoa or a warm cup of tea.
Top Tips for Perfecting Your Cake
Here are a few of my top tips for perfecting this cake:
Zucchini Prep: Make sure to grate the zucchini just before using it, as it will be too watery if it sits for too long.
Mixing Advice: Don’t overmix the batter – it should be smooth, but still retain a bit of texture.
Swirl Customization: Experiment with different toppings or mix-ins to create a unique design.
Ingredient Swaps: Try using different types of milk or sugar to create a unique flavor profile.
Baking Tips: Make sure to not overbake the cake – it should be tender and moist, not dry and crumbly.
Glaze Variations: Experiment with different flavors or consistency levels to create a unique glaze.
Storing and Reheating Tips
Here are a few of my top tips for storing and reheating this cake:
Room Temperature: Store the cake at room temperature for up to 3 days.
Refrigerator Storage: Store the cake in an airtight container in the refrigerator for up to 5 days.
Freezer Instructions: Wrap the cake tightly in plastic wrap or aluminum foil and store in the freezer for up to 2 months.
Glaze Timing Advice: Add the glaze just before serving, as it will be too runny if it sits for too long.
Frequently Asked Questions
Final Thoughts & Conclusion
And there you have it – a delicious, versatile, and easy-to-make cake that’s sure to please even the pickiest of eaters. Whether you’re serving it as a dessert, a snack, or even a breakfast treat, this cake is sure to bring a smile to everyone’s face. So go ahead, give it a try, and let me know how it turns out! Happy baking, and don’t forget to share your creations with me on social media using the hashtag #humanrecipe.